Friday, August 24, 2012

Cloth Diaper Inserts Tutorial

The Tutorial

You will need
1 yd fleece
1 pack of microfiber towels (find them in the automotive dept at Walmart)

You will use
rotary cutter & cutting mat (trust me, it will make your life easier)
sewing machine or serger

Instructions, simplified
1) Cut fabric
2) Layer fabric: two pieces of fleece with two pieces of microfiber in between. Total of 4-5 layers.
3) Stitch ends to secure them
4) Stitch/serge around edges. 
5) Wash on hot & tumble dry


Detailed Instructions

1) Cut fabric
This depends on the size of diaper you are making these for.
gDiaper TinyG's: 4" x 10.5"
gDiaper Size Small: 4.5" x 11.5"
gDiaper Size Med/L/XL: 5.5" x 13.5"


Cutting Diagram for Tiny G Inserts
For my TinyG's, out of the 1 pack of microfiber towels and a yard of fleece (had some fleece left over even), I got 16 diaper inserts. For larger inserts you won't get quite as many. I paid $5 for the towels and $6.97 for a yard of fleece at Walmart. I decided not to go with the cheap, white fleece there, because it wasn't as soft. There was some there for $3-something per yard, that was white. Even so, however, I paid less than $0.75 per insert... whereas the gDiaper inserts will run you about $5 a piece at full price.

If you are using a serger, add about a half-inch when you're cutting, to allow for what the serger will trim off. Alas, I do not have a serger (poor me.) and used a regular sewing machine, and cut it the size I wanted the finished product.
The microfiber towels kindof lie, however... they say they are 14x14, but that's stretching the truth just a bit. Plan on them being more like 13.5" or so. Since I am making inserts for the TinyG's, I fit 4 per towel; three across and one along the bottom. They weren't quite as big as 10.5x4. More like 10x4 except for the one the went lengthwise.


2) Layer fabric pieces
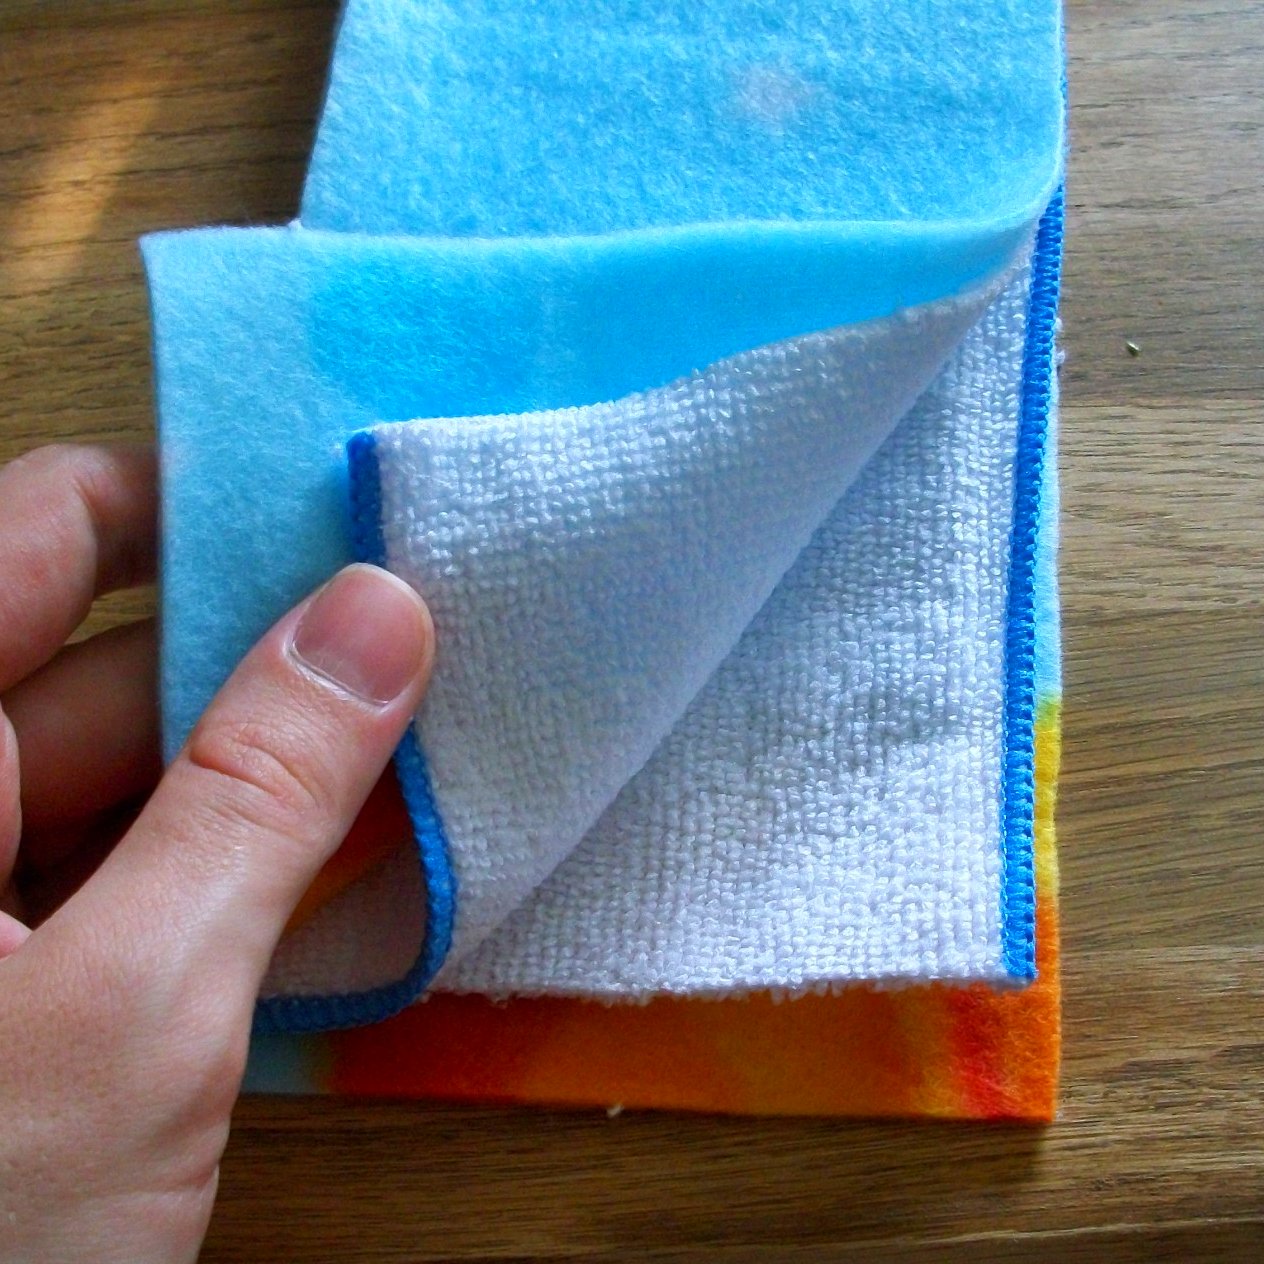
Two layers of fleece with two layers of microfiber between them... like a sandwich... total of 4 layers. If you are making inserts for larger diapers or an older child, you may consider adding more microfiber layers- just a guess. My newborn is great with just the 4, but he is still just little.

EDIT 5/2013 when my baby grew into the next size up, I went ahead and made the inserts with three inner layers.  These have been working beautifully. He is 10 months old and they are still absorbing all they need to. For these, I went with the orange/green/yellow microfiber towels at Walmart- they are a bit larger. I got 3 out of each towel, so one towel=one insert. 

TIP: Microfiber is super absorbent... great for the inner linings of the diaper insert, but do not let it rest against baby's skin. It is so absorbent that it will dry baby's skin out. Fleece is a good choice, as it is absorbent and keeps baby feeling dry.


3) Stitch ends to secure them (Skip if you didn't skimp on your microfiber like I did) 
I put a tiny stitch on each end of the microfiber, securing it to one layer of the fleece. I didn't want to stitch to all the layers, as I wasn't sure what any stitching/quilting would do to the absorbency of the diaper. This held it in place, and will ensure it stays in place through washings as well, even if the ends are not sewn into the outer seam. I chose to do this anyway, even on the ones I made where there was plenty of microfiber, just because it helped it not to slip as I sewed it. (I was too lazy to pin it... besides I was trying to tell my OCD self that these don't have to be pretty. They are going to get pooped on.)


4) Stitch/Serge around the edges
Fleece does not ravel, so there's no need to turn it and a tight zig-zag is just fine... it just maybe doesn't look as pretty. Make sure you're catching all 4 layers, at least on the long seams. If you do that, you should have no trouble with it bunching up inside when you wash it. Especially if you've secured the ends also.

5) Wash on hot and tumble dry before use
Just like when you buy new towels or new washcloths, these won't be very absorbent til after they've been washed. Other diaper insert brands suggest pre-washing something like 5 times. When I changed the first diaper using these inserts I wasn't sure if he was even wet- since it still felt pretty dry to the touch. I decided it was maybe just a bit damp to the touch, and definitely heavier than a dry one. 
Wet diaper that feels dry = success!


The Story

Part One of my story: (disclaimer: not very exciting, but helps give background for part two)
My husband has always planned on cloth-diapering his children. I have always adamantly planned on NOT using cloth diapers. Ask my sister how adamant we were on this point... "No way am I washing out poopy diapers!" 

When I got pregnant, however, I decided I would make my husband happy and at least consider cloth diapers. And upon looking, I found a happy compromise called gDiapers! Part disposable (even flushable, which goes away faster... no waiting for the trash pickup to get rid of the stink.) and part washable and reusable.


diaper liners
Uno problemo. Price. Yes, in the long run, it would still probably save money (oh yes and the environment and all that) but its still a chunk of change to go laying out there.  The more disposable option is actually more expensive than regular disposable diapers, basically your only benefit with those is the convenience and earth-friendly value. The option I decided to try was called gCloth, and is the part that absorbs the wet, and is washable. You line it with a diaper liner, which is like $9 for a box of 105 of the things. That is the only part we will have to re-purchase. The rest is simply an investment for all our future children's diapering. HUGE diaper deal in my opinion, compared to regular disposables.


The little gPants (diaper covers) I got on Ebay, some new, some used, and saved at least 50% on retail cost on all of those. Same with the gCloth inserts. I didn't get a boatload of the med/large gCloth- I figured I'd start with the size small, and purchase more M/L later when we were closer to needing it. I went ahead and got a half-pack of their newborn size gpants, called Tiny gPants. When I looked for the gCloth to fit those however, there wasn't one. I searched online and the best answer I found was that they were designed to use the flushable inserts only, and they did not make a gCloth insert for this size. (I could be wrong, but I didn't find them anywhere.) 

I figured if we ended up needing this size, we would figure out what to do then.... I'm actually not sure what I had planned on doing for sure. We were fully expecting a bigger baby- 8-9 pounds at least, simply because that's what both our moms had. My husband is one of 7, and I'm one of 10. With most of the babies being 8, 9, or 10 lb. in both families, we were pretty sure that's what we'd have too. The size small gDiapers start at 8 lb, so the tiny G's were "just in case" anyway.


Baby Ivan, 12 hours old
Part Two of my story is a bit more exciting:
 Our baby surprised us and came 6 weeks early!
Now what? "Now what" is right! We still had a lot on our list of things to get done in the last few weeks before he was born! He was in the hospital for 3 weeks, which helped/didn't help... They supplied the diapers at least, but didn't give me time to do anything at home, as I stayed there with him 24/7 so I could nurse. We live just far enough away from the hospital for it to not be easy to go home in between feedings.

When we did finally get to come home, we still had a few preemie diapers, as he wasn't big enough yet for even the tinyG's, and did have a bag and a box (so I thought) of newborn-size diapers. When he hit 6 lb, I was ready to try the TinyG's. I wasn't sure what to use for an insert, so I tried a couple things. First I tried folding up an old washcloth that I had, which worked okay, except that it was a bit labor-intensive for each diaper change to get it folded right, and stuff it in there without unfolding it. They also crunched up in his diaper as soon as they got wet, and so the gPants got messier than they should have. They also didn't keep him very dry, so I was worried about him getting a rash or something. They were also bulky.

My little man keeping himself entertained while I sew
Plan B was to try the size small gCloth inserts. Again, these worked okay, but because they were a bit big, they crinkled inside the pant, and let poo get around it into the gPants (which are supposed to stay relatively clean, so you don't have to wash them each time.). 

While we were figuring this out, we used mainly the disposable newborn size diapers that were given to us. Like I said, we had a bag and a whole box, right? He might be 8 lb before he gets through them all anyway. Wrong. Mainly wrong, because what I thought was a box of newborn diapers was actually a box of size 1... which starts at 8 lb. He was only 6 lb, and has skinny little legs. Those were not going to work, so we went strictly to the tinyG's by default.

The washcloths and size small inserts were not working. I knew I was going to need to just make some inserts that would actually fit. So that's what I did, and I wish I had done it sooner! They work amazing, and are so much less bulky than the too-big inserts or the washcloths. 
His little diaper butt is actually cuddly again. (Don't laugh at me--you moms know what I'm talking about.)

Happy mom, stay-dry feel diapers, easy diapering, money saved... Happy ending!


Monday, August 13, 2012

DIY Wall "Decal" Tutorial

I love wall decals. Words, graphics, you name it. But we have one problem. I'm too cheap to buy them, and here's why: I know I can make them myself. I do not have a Cricut, which would allow me to make them faster and easier, but there is a way to do it with good old fashioned paint and brushes.

After several hours (maybe several days... I didn't really keep track of the time) on Pinterest, I had an image of how I wanted our baby room to look, which was with two colors of grey walls, white birch trees, yellow birds, and then the words to a Mark Harris song that makes my hubby and I cry, called Find Your Wings (kinda ties in the birds).

So. How to achieve this without paying an arm and a leg for decals? Not to mention, the walls are heavily textured in there, and I'm pretty sure decals would be a pain in the rear to put up. Especially with words- I'm afraid the letters would end up distorted.

Here's how we did it. We started with paint. I don't know if you were counting, but there were 4 different colors of paint required for the look I had dreamed up. Paint is expensive. I did not know how much we would need, but after lots of looking online at various paint calculators, I figured we'd need at least a gallon of one of the greys- and more than a quart of the other grey. Since we needed more than a quart, it was worth our money to just buy a whole gallon. (I've never been sure why they don't sell paint in half-gallons. Really. Someone needs to think this through.)

Just needed a tiny bit of yellow, and a little white. Again, not sure how much white, because we also planned to re-finish our writing desk and paint it white for the changing table. I thought to save money we'd probably have enough with just a quart. I hated spending almost as much as a whole gallon just for a quart, but thought a few dollars saved would be a good thing. I lucked out, though, for when we got to the store, I thought to check the "Oops Shelf" and found some delightful Cotton White in the better quality brand. A gallon of that Oops Cotton White cost the same as a quart of the cheap white. So we bought that- there's always a need for white paint around the house- especially since all our trim is painted white.

Yellow. I was not looking forward to paying for a full quart when I knew we just needed a tiny tiny bit. I thought about buying some acrylic craft paint for $1.50 or so, but really wanted the satin finish you can get with wall paint. I lucked out again, however, when I discovered that the nice brand offers paint color testers for just a couple dollars ($3.47 I think?) in the satin or eggshell finish that we wanted. Score! We chose Canary Song. For artwork, don't use the brush included, however, because it's pretty much terrible.

Ready to start painting. Because I was pregnant when we were doing this project, there was a certain look involved. Face mask- the husband insisted. I complied, even though it was sweaty and hard to breathe through. 2X T-Shirt that I didn't care about. I always paint in clothes I don't care about, just in case. Problem, though, with shorts. All the maternity shorts I owned up to this point were borrowed. All my athletic shorts I cared about too much to get paint on them. It took me a few minutes to figure out the solution. PJ Shorts. I found a pair of those with an elastic waist that I didn't care whether they got paint on them or not. These have snowmen on them. Doesn't my painting ensemble make everyone jealous? Ha ha.

We painted the grey walls first. I did the trim and my husband used the roller. These walls were heavily textured, as I said, so we ended up using a lot more paint than anticipated. We had just barely enough, but only got one coat done. We decided not to try to remove the wallpaper or teddy decals at the top of the room. I had a nightmarish experience removing wallpaper in the house I grew up in, so didn't want to mess with it. It turned out just fine to paint over it.


TIP: Paint textured walls with a nice, fluffy roller. A thin roller will only be frustrating and use a lot more muscle to get it into all the crevices.

Time for the decals. Or, non-decals. Here's how we did it. I freehanded some trees on some old-school transparencies, and then decided I maybe ought to use an image of some professional ones. We ended up using both, but here's how we copied the decals you can purchase. I found a picture of a decal design that I liked, and then blew the image up as big as I could on the computer (no need to print it, I could trace it just fine this way.) and traced it. I was a bit nervous that I'd accidentally mark on the screen, so I drew a "stop" line on either end, as you can see in the photo.


Tracing the image on the computer screen
Tree transparencies

For the words, I used a transparency that I'd purchased a while ago that you can use a regular ink-jet printer to print on, and printed what I wanted using a regular word-processing program. I went ahead and put the words for both walls on one sheet- I didn't see the sense in using up two sheets. I found them at Amazon.com. They were cheaper than what I could buy at the office supply store. I could have freehanded the birds, too, but decided that a stencil would make my life easier. I had my eye on one at Hobby Lobby from when I first dreamed up this project, and when I went to go buy it, armed with my 40% off coupon (never go to Hobby Lobby without it. You can print it free online.), I found that it was on clearance! Score again!

Bird stencil, Words transparency, Tree Transparencies. Ready to go!

Now the fun part- watching it all come together. We borrowed a projector from my father in law, and projected the images up on the wall and simply traced. I knew these trees were pretty forgiving, so in places I'd skip a branch, or add a knick in the wood here or there, just for variety. Again, I'd trace and do the trim, and my husband went behind me and filled it in. For these, I used a 3/8" deerfoot brush for the trim. It filled in the crevices of the textured walls nicely, and left a nice clean edge. This was a matter of trial and error to figure out what brush would work best. A flat brush was a bad plan. Go with a deerfoot brush. 
You will also probably want to move the projector or the transparencies several times. I ended up moving the transparencies for each tree, just to flip it over or move it closer the the other tree, etc. I only moved the projector per each corner.


 Next came the words. Same thing, project the image on the wall, and trace. For these, the font I used was pretty fine, so I needed a fine brush. For precision, though, I chose one that had very short bristles. I used this mini multimedia paintbrush from Hobby Lobby and it was perfect.

EDIT 12/2012: Some of you were asking what font I used. I used "Daniel" which you can download here

Tracing the words


Next came the birds. These I had intended to use a sponge brush (just the cheapy disposable brushes) with the stencil. However this did not work so well because of the textured walls. If you have plain walls, one of those would probably be fine. I ended up using the deerfoot brush again and then sharpening the edges after taking away the stencil. One thing to remember is to clean the stencil after each bird, so you don't leave smears when you move it to the next spot. Same goes for flipping it over to make the birds face a different way. Just use common sense and be careful. 

Here are some pictures of the finished project. We will post pics of the completed nursery when everything is moved in and finished. (ahem... that desk. That's still needing finished.)


To summarize:
1) Calculate and buy paint
2) Secure projector and good brushes
3) Put design on transparencies
4) Paint base on wall, if not already painted
5) Project design on wall
6) Trace design edges
7) Fill in (Don't necessarily need the projector turned on for this part. It does get hot standing in the light)
8) Repeat for second color or use stencil for finishing touches