Tuesday, December 11, 2012

Accent Table Round Tablecloth Tutorial


You know the ones, the little round tables with 3 legs that sit beside your favorite chair, usually with a lamp on it. And a few good books. And coffee...  mmm coffee...
Ahem.
Sorry I got distracted.
Where was I? Accent table. Ah yes.

Well I got one at a garage sale this summer for a dime. (Score!) And all it needed was a tablecloth. I know those tables aren't too expensive brand new, and probably neither are the tablecloths, but both new together would probably run me about $30+ and at that cost I most likely would've decided to do without.
But 10 cents... shoot, who can say no to that? I figured I could make a tablecloth easy enough with all the $1/yd fabric I got for nursery stuff.

So I did. Here's how to make your own.


You will need:
2 yds fabric
Measuring tape
Pencil or chalk to mark with
Scissors
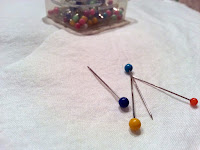
Pins

Optional but handy:
Rotary cutter
Cutting mat
Ruler or cutting guide

Here are the cutting instructions. If you are awesome, and can figure out how to fit the pieces onto 2 yds of fabric all by yourself, then skim the cutting section just for your calculation formulas.

Begin by measuring your table: across the widest part of the top, and then from the tabletop to the floor.
Mine was 20" across and 25" tall.

Cutting the circle
Add one inch to the top measurement.
Then divide by 2.
Example: Mine was 20" across.
20 +1 = 21
21 / 2 = 10.5 (this will be your radius for cutting)
Open up your fabric so that its a single layer. take the number you just came up with & measure that far from the end of the fabric &make a small dot. This will be the center of your circle.


Hold the end of the measuring tape at the dot, and put a mark on the fabric at the length of your radius. (mine = 10.5)


Keeping the end on the dot, rotate the other end all the way around the circle, making a mark every few inches, making a circle. Lightly connect the marks with your pencil. Cut out your circle.

line  is really faint, but if you look close you can see it


Cutting the panels
Refold your fabric. Measure across. It should be at least the length of the height of your table. If so, do a little celebration cheer. (If you're like me, cutting out is the worst. Yucky.)

Assuming the fabric is wide enough when it's folded, you will be able to get two pieces across it.
More math... here we go.
Finding your panel width: Take the diameter of the tabletop and multiply by pi to get the circumference.
I'll use mine for the example again:
20 x 3.14 = 62.8
Divide by 4 and add 1 (for 1/2" seam allowance):
62.8 / 4 = 15.7
15.7 + 1 = 16.75
(To make it easier I went to the nearest quarter inch)

Finding your panel height:  Take the height of your table and add about an inch and a half. (For seam allowance and hem.)
My Panel Height:
25 + 1.5 = 26.5

Cut four panels this size.

Mine:
Four 16.75 by 26.5 panels

You should only have to cut two strips if your fabric is folded. Then cut the fold to make each strip into two pieces.

Cutting the triangles
Now with the rest of your fabric still folded, cut a strip about 10 - 15 inches wide, and the same height as your panels. (Mine=26.5") I did 10" wide, but you could do 15" or even the remainder of your yardage to make a fuller tableskirt.
Cut the fold to make this into two pieces.
Next cut from corner to corner, to make triangles. I folded mine & cut along the fold, but you could mark it too. It doesn't make a difference.


Stack all your triangles.


Now take your height-plus-seam-allowance height... (Mine=26.5), and measure that along the longer side of the triangle, as shown, and a time or two in between. (the same way you made your circle earlier)


Connect the dots- should be a slightly curved line. You could probably cut it straight, and no one would be the wiser. Do what you want to.


If I just made you all confused on the cutting layout, here is a diagram.


You should now have:
1 circle
4 panels
4 triangles
.
Putting it all together
Pin and and sew together the skirt pieces. It should be a pattern of Triangle, Panel, Triangle, Panel, and so on. Here's a few pictures.


Pin and sew the circle to the top, making sure to keep right sides together.

TIP: Newbies, it is a little tricky to sew a round thing to a straight thing. What helps make it easier is to use LOTS of pins! Start by pinning the circle on opposite sides, matching it up to the seams on the skirt (12 o'clock and 6 o'clock) and then the other two sides, lining up with the seams (3 o'clock and 9 o'clock) and then putting a pin in the center of the space between each of those pins, and then another in the center between each of those.

Last but not least, hem the bottom. I just used a simple roll hem, and didn't even bother ironing it over. Apples to Applique has an awesome (and super easy!) tutorial on how to make a nice professional rolled hem.You could do that if you want, especially if your fabric is difficult to work with, or if your triangle pieces are very wide.


Ta Da!
Tip: You could add variety, kindof a shabby-chic look to it, and make your triangles and/or panels out of different patterned coordinating fabrics. Or you could add some trim to the bottom, or some appliques to the skirt to personalize it. Have fun with it! I would love to see pics of yours!


Friday, December 7, 2012

Easy Mirror Upcycle DIY Tutorial


Find some mirrors at a thrift store or garage sale. Look for ones that have an interesting texture or pattern. Plain square ones will work fine too, just keep in mind that the texture and shape are the only things that will remain the same, and any nasty or outdated color will go away.

Poof! Just like that. It's wonderful.

Tape off the glass or remove it. Out of the three I did, only one had glass that was removable. Thank goodness it was the oval one, as that would've been a bear to try to tape off.


Paint. You can use spray paint, but I'm a satin-finish kind of gal myself. I like that it's not shiny and glossy, but it's not disgusting flat paint either. I am very opposed to flat paint, as stated in my previous post.

You may have to do several coats. I needed three. I may have only needed two if I had taken the time to stir the paint better... I am still using that can of Oops White I got for the wall decals.

I used a little bit of the yellow canary paint that was left from the wall decals as well. There's still some left in that little container for future painting pleasure.

When it's completely dry, remove the tape and use a razor blade to scrape away any wayward paint. Depending on the tape you used you may also need to use some rubbing alcohol to get away the goo from the tape. My goo was minimal and went away when I used the razor blade. I used frog tape and it worked really well.


Hang and congratulate yourself for a job well done.
TIP: For a mirror collage like this one, play with different arrangements! Keep in mind that you can turn your mirror a different direction than you might be apt at first to hang it. You might be pleased and surprised with the results!


See if you spy these mirrors as photo props in my Etsy shop!

Monday, December 3, 2012

Theory About Oregano

How to prepare oregano
I have a theory.
Disclaimer: it is a Nicole-Theory. My family is familiar with this disclaimer, but since you are not, I will explain. It is simply a theory I come up with, because it seems to make perfect sense to me, and I have no opposing evidence. I don't always have any evidence to begin with; often it's just an idea that has popped into my head that I like, and therefore hang on to.
There. Now you, too, know about Nicole-Theories. Don't you feel included?


So my theory is that oregano must be considered a weed somewhere.

This spring, we purchased a few herb starter-plants. 2 parsley, 1 sage, 1 oregano, 1 basil. They were all pretty healthy-looking except for the oregano. It was kindof Charlie-Brown. 
We my husband planted them all, and we my husband split the oregano into two, and planted it in two spots. We didn't really expect it to survive. The rest we were ok with, but this we didn't have a lot of faith in.

We were wrong.
It grew, and it grew... I feel like Dr. Seuss. It grew and it grew and it grew.
I even harvested more than I felt was appropriate because I thought maybe I would contain it somehow. 

I was wrong again.
It's ok though, we'll just have plenty of oregano.


Here's some tips we figured out that makes growing/harvesting/using it easier.
  • One plant is plenty. Really.
  • Harvest out of the middle of the plant, the sprouts that are growing up tall but don't have anywhere to root themselves.
  • Also harvest the edges, where it is growing out of the zone. Ours is in a raised garden, but ours came with the house, and is built up by rocks. I cut off the sprigs that hung over the edges, and, again, had nowhere to root themselves.
  • Pluck the leaves off before it is dried. This is much easier. You can get most of them off by dragging pinched fingers from the top to bottom of each sprig. Any that got past you can be plucked manually.
  • Now you can either lay them out flat on a cookie sheet (We use the pizza pans with holes in them, and they are great, but a regular cookie sheet will be fine too.) or use them right away.
TIP: if using herbs in a soup, put dry herbs in toward the end, as they will tend to break down the llonger they cook. Put fresh herbs in toward the beginning, especially great for slow-cooker recipes, as when fresh herbs cook for a while, more flavor is released.

I use my little Braun food chopper with fresh and with dried herbs. It works perfect, and is much faster and much less messy than crushing the herbs by hand.

Here's where a little ingenuity comes in. Originally I bought some spice containers at our local Spice Merchant. I love that store, and it was the perfect excuse reason to go in. I may or may not have made a detour over by the flavored coffees, specialty tea blends and rows of delightful Torani syrup.


The spice containers weren't expensive, especially compared to others I found at the store. I really wanted ones with a shaker/spoon opening. Also ones that were air-tight. I may have organized my spice cabinet, (post for another time), but still get the occasional avalanche. I have thought about getting salt/pepper shakers, but decided against it for that reason.

But back to my Nicole-Theory about Oregano being a weed. When we first started harvesting our herbs this spring, we had just emptied out the oregano from the store, so we just used that container. It is full now. In fact it was full long before the growing season was over. (Who am I kidding? I told you that stuff was a weed somewhere... you can't kill it. It has gotten down below freezing several times this fall/winter, and the stuff is still kickin. Again, cool- we won't run out of oregano any time soon, but still...)

 Instead of going and continuing to buy more shakers at the Spice Merchant, I decided to start saving the shakers from other spices and such as they ran out. We now have one for the basil (already labeled... how cool is that?) next summer when we get more of that. And a bigger shaker, the parmesan container. We have emptied two of those (what can I say? We love us some Italian food!) and I've stuck them in the dishwasher and saved them for our herbs. 

Because I don't think we'll be making our own parmesan cheese anytime soon, this is a great system for me. Empty parmesan, dishwasher it, and put our abundance of oregano in it. No more trips into town to the Spice Merchant. Oh, wait. I liked the excuse of going there. We may have to re-think this. *grin*

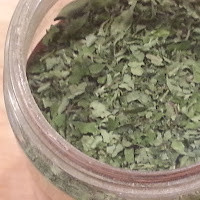
Contrast in colors. Green is garden oregano.
Just as a side note: When we first dumped the oregano into the empty container from the store, there was actually a teensy bit left in the bottom. Look, though at the contrast between the colors! Just looking at that browny dull stuff from the store makes me never want to buy it anymore, and always just use garden-oregano. In this pic it was hand crushed, so didn't get as small as when I use the Braun.

Saturday, November 3, 2012

Easy Microwave Butternut Squash Soup

Making the Soup

Easy Microwave Butternut Squash Soup
2 C. cooked butternut squash
3/4 C. chicken broth/bouillon
1/4 C. sour cream or cream cheese
1/4 C. chopped red onion
1 T. butter/margarine
1/8-1/4 tsp. basil
dash cayenne

Combine ingredients in microwave safe bowl, and microwave 5 min, stirring every couple minutes.
Serve and enjoy. I told you it was easy.

No blender or food processor necessary. This way you can enjoy the great texture of the butternut squash, and have virtually no clean-up. Since I eye-balled the ingredients when I put them in, the only dishes I had were the bowl I cooked in, the bowl I ate from, spoon and butter knife. I have been known to make a half-recipe in the bowl I eat from, and just have a single serving lunch that takes about as long to make as a can of soup would- but is far more delicious and nutritious.

Cooking the Squash
If you do not have cooked butternut squash on hand, here is how you do it the easy way.

  • Slice a butternut squash lengthwise, and scoop out the seeds and extra pulp. 
  • Place in a sheet cake pan or 9x13 (if it fits. Some squash are very long and skinny) shell-side up. 
  • Pour in just enough water to seal around the edges.

TIP: If you didn't cut your squash very straight, and there is a gap, it's fine. As long as most the edges are sealed it helps the squash not get too dry.

  • Cook about 30-45 min at 350. When it's done, you should be able to poke a fork easily into the skinny part of the squash.
  • Cool enough to handle and scoop out the butternut squash goodness. 
TIP: This scooped squash freezes really well, and we store ours in quart-size Ziploc bags in the freezer, thawing just as much as we plan to use that day. For this recipe, I used half of a bag.


Friday, October 19, 2012

Changing Table under $15

New nursery does not have to equal lots of $$$$.
Not so much $$$ does not have to mean ugly nursery.

Here's how we did the changing table for under $15.


This is the desk we got from Goodwill for $5 several years ago. Just a normal writing desk... most thrift stores usually have at least a couple.


We removed the drawers and drawer pulls sanded it down, so there was no more gloss from the previous varnish. It looked cool like that, and I considered just leaving it like that, but decided not to.

Done sanding, we took a damp cloth and went over all the surfaces, to remove any remaining sawdust.
Then, filled the knob holes with wood putty. I did not go all the way through, as you will see in the picture. Basically just enough for it to look fine from the front. (After my dad saw it, he said I probably should've done the whole hole- he's probably right. Maybe someday I will go fill it from the inside.... but knowing my track record, probably not.) I had to fill the front a couple times, because as it dried, the putty sunk in, leaving a tiny crater. After it was filled smooth to my satisfaction, I sanded away any extra lumps I didn't get scraped away while the putty was wet.


Then we got to paint! It took about 3 coats of Satin/Eggshell paint. I didn't want it too glossy, and abhor flat paint, especially the feel of it. The Eggshell was just exactly what I imagined. We used what was left over from the wall "decal" birch trees we did in the nursery.

Next, we inserted the drawer pulls from Hobby Lobby. Each one cost about $2.50. Beautiful, however they had really long screws, and would've stuck out inside the drawer. 


I took them over to my dad's (unfortunately did not get pictures of this part of the process.) and he used his screw-cutter to cut them off. We also had to drill a space just wide enough for the nut on the back, but not so deep that the screw would come through. About half-way through the drawer. Here's what it looks like from the inside.


Put it all together, and here's our beautiful changing table!

The changing table pad on top was blank, and I made the cover for it following this excellent changing table pad cover tutorial. Although I will say, she's right, you do need more elastic. I don't know exactly how  much I used, but it was more than three feet. Just FYI.


Sunday, October 14, 2012

House Address Numbers Makeover

So, since we moved in over 3 years ago, I haven't been crazy about the house numbers. For one, they were a bit plain, but more then that, they are hard to see... especially at night.
We don't have numbers on our mailbox yet (Yes I said 'yet'. I know, I know.), so people rely one the house numbers to find our house. When giving directions, I always had to tell people what the house looked like, following it up with the comment"the house numbers are hard to see."
Before: Hard To See

Time to fix that problem. I looked for clever ideas online and found a few, but most of the ideas used a bigger craft budget than I have. I finally thought of what we would do. using stuff we had at the house already.

Here's what I gathered:
pizza box
masking tape
scissors
cotton balls
alcohol
screwdriver
metallic spray paint
the original house numbers


Clean the numbers with alcohol. Not sure if it was terribly necessary but thought it couldn't hurt.

Cut masking tape into thin strips and tape design onto house numbers. The 5 was tricky, because of the curves. Those of you with 1's, 4's and 7's in your address... be thankful. ☺


I saw that the screws were rusty, so decided they needed paint too.


If yours are the same, or if you're just a fan of coordinated screws, poke the screws into the box. This prevents the threads from getting paint in them. I thought about just screwing them into the numbers before painting, but this way you can be sure they don't get stuck to the number with the paint.


Spray! Spray a second coat if needed. I used the Krylon Outdoor Hammered Finish in a bronze color. I had this already at the house from a project I did a few years ago.


Peel off the masking tape. Hang and admire!